ITA Matrix is a very powerful piece of software originally created by MIT scientists in the 1990s and now owned by Google.
ITA Matrix feels like Google Flights on steroids, as though it was developed specifically for aviation geeks like ourselves who go to great lengths to guarantee an aircraft type, book the absolutely tightest connection, or earn the most qualifying miles for our dollars.
Despite its power, ITA Matrix is not necessarily known for being the most user-friendly. So while we’ve mentioned it in passing a few times before, it’s now time to dig a little deeper into the inner workings of one of the most powerful flight-search tools out there.
This installment is a guide to ITA Matrix’s full suite of features. We’ll cover the basics of ITA Matrix, with some of the more common filters and specifications, as well as more advanced maneuvers, in this article.
In This Post
- Basic Search Options
- Advanced Controls
- Putting It All Together
- More Advanced Controls
- How to Book Itineraries Found on ITA Matrix
- ITA Matrix PowerTools
- Conclusion
Basic Search Options
ITA Matrix is accessible at the website matrix.itasoftware.com, and the search engine is available directly on the home page. The old interface, which will be decommissioned by the end of 2024, has been replaced by a modern one, while the core functions remain the same.
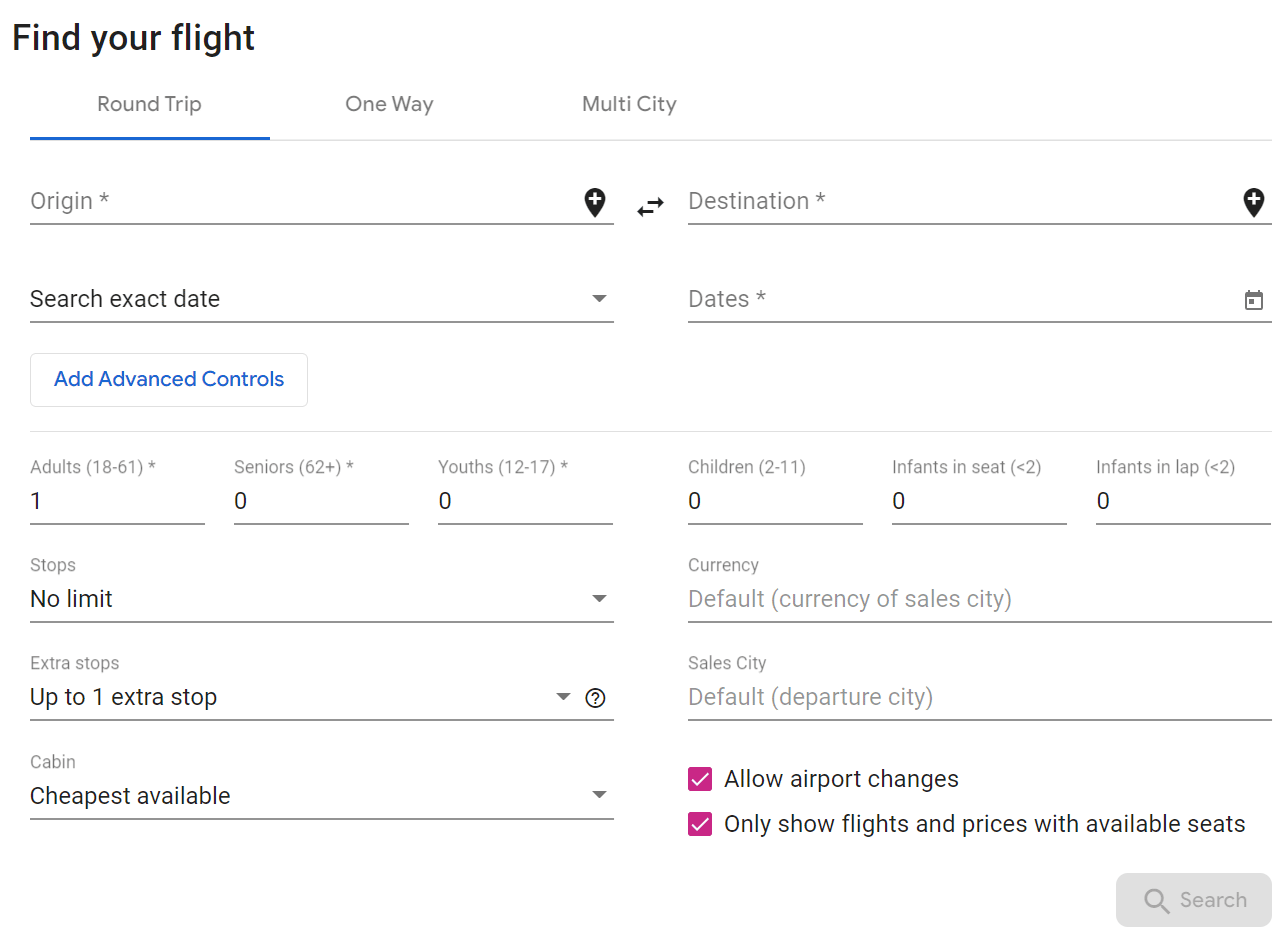
To start, we have options for round-trip, one-way, or multi-city flights at the tabs on the top of the “Find your flight” box.
We’ll focus on one-way flights for most of this guide, as round-trips follow essentially the same process with the opposite direction included. Later on, we’ll look at multi-city searches, as they are slightly more complex.
Origin & Destination
We begin by inputting our origin and destination airports. ITA Matrix allows you to input either the airport code or the city name, where the city name encompasses all airports within the city.
For example, “Toronto, ON, Canada – All airports” would include Toronto Pearson (YYZ), as well as Toronto Billy Bishop (YTZ), as co-terminal airports.

You should stick to airport codes rather than city codes if you want maximum precision, especially as things get more advanced later on.
The first noteworthy feature is ITA Matrix’s “Nearby” feature, which identifies nearby airports to the one you’ve selected that can allow you to save money on airfare. After all, for the budget-conscious traveller, a short bus or train ride can prove to be a worthy endeavour if it allows you to save a few hundred bucks on your flights.
After inputting “YYZ” for Toronto, click on the “YYZ” button to bring up the “Advanced Airport Search.” This search allows you to specify the distance you’re willing to travel away from your origin airport.
You can either pick them individually or simply “Select all”, and the field will automatically populate with the corresponding airport codes.
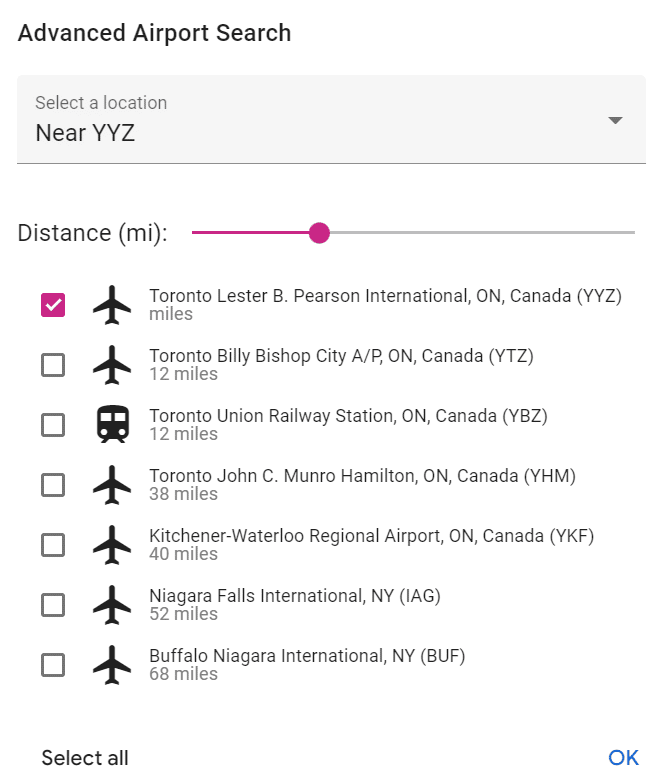
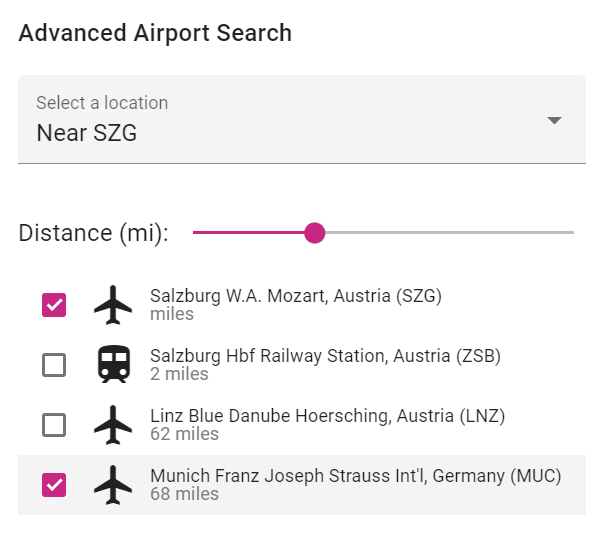
The same goes for the “Destination” field, where you can choose to fly to any airport within a certain distance from the one you prefer.
This is particularly useful for Europe, since airfares can vary significantly between neighbouring countries: for example, flying into Munich instead of Salzburg (a mere 68 miles away) can often be significantly cheaper.
Travel Dates
Next, we have the dates. You can choose between “Search exact date” or “See calendar of lowest fares”.
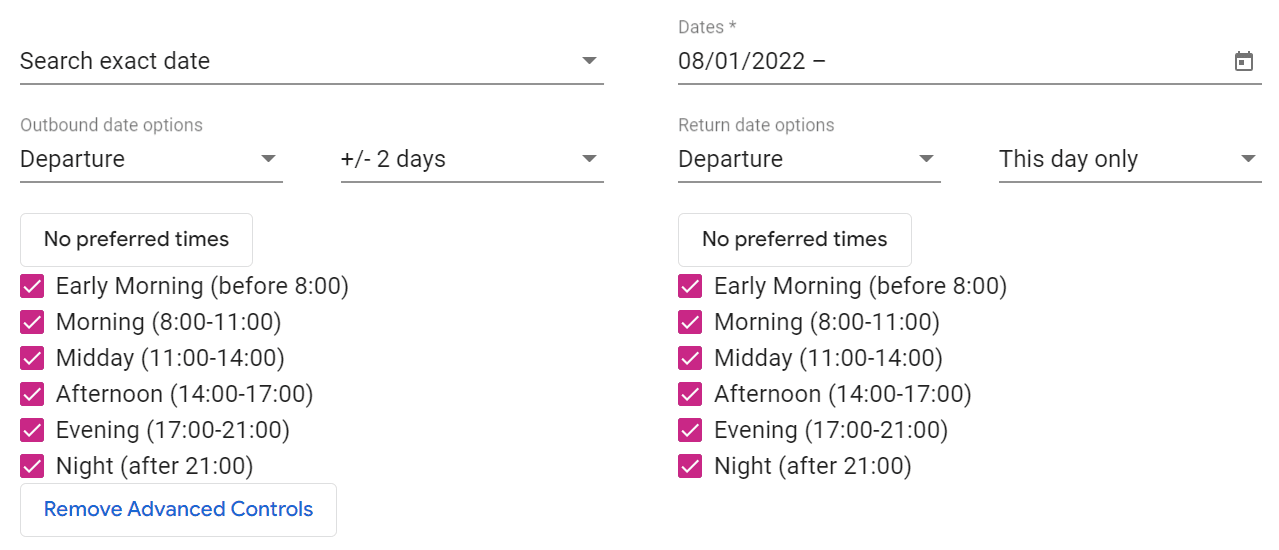
The former option allows you to specify exact dates, but also lets you expand that selection to the day before, the day after, +/- 1 day, or +/- 2 days. To enable this, you’ll have to click on “Add Advanced Controls” to bring up the drop-down menus (similar to how ExpertFlyer’s flexible date selection works).
You can also filter for the preferred time of day for your departing flight.
With the calendar, you’ll be looking one month at a time, so you’ll begin by selecting the first date of your desired month-long period. ITA Matrix will return an entire month’s worth of airfare results in the form of the calendar over this month-long period.
If you’re booking a round-trip, then you’ll also choose the length of your stay in terms of the number of nights (either a fixed number or a range); ITA Matrix will then search for the cheapest fares across the entire range of possibilities for outbound and departure dates.

Other Criteria
Then, you can also specify the number of passengers, class of service, and how many stops you’d like on your journey.
The “Stops” setting allows you to set an absolute limit on the number of connections, whereas the “Extra stops” allow you to specify how many stops beyond the minimum possible number of stops that you’d be comfortable with.
Finally, you can toggle whether you’d like to allow airport changes on the way (such as flying into LaGuardia and out of JFK, if it’ll result in a cheaper fare), your preferred currency (such as CAD or USD for easy comparison), and the “sales city” of the fare (accounting for the fact that airfare and/or fare availability can often vary depending on where it is purchased).

Advanced Controls
We can see an “Advanced Controls” button just under the dropdown list to search for exact dates or a calendar of lowest fares.
Clicking on this will cause a couple of additional fields to appear under the “Origin” and “Destination” fields: Routing Codes and Extension Codes.

There’s a little question mark you can click on, which will provide more information on what arguments these fields accept as parameters and the appropriate syntax.
Routing Codes
We’ll begin with the Routing codes. There are generally two types of codes we can input as Routing codes: preferred connections and preferred airlines.
ITA Matrix’s list of examples for Routing codes is as follows, and we’ll also take a look at some of our own examples:
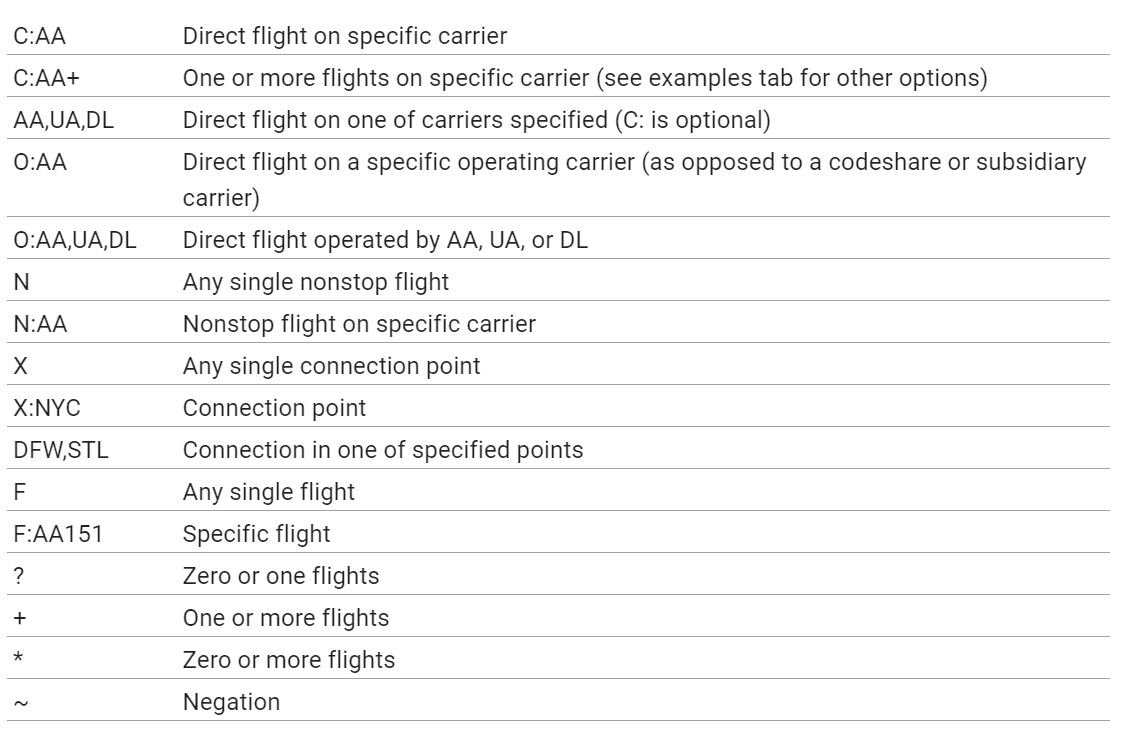
Here are a few of the rules you can use to specify an exact type of itinerary on an exact airlines, using the two-letter IATA code for the airline:
-
“AC”: Direct flight on Air Canada
-
“AC+”: One or more flights on Air Canada
-
“~AC”: Direct flight that must not be on Air Canada
-
“~AC+”: One or more flights, which must not be on Air Canada
-
Combining the above rules using a comma separator:
-
“AC,UA”: Direct flight on either Air Canada or United
-
“AC,UA+”: One or more flights on either Air Canada or United
-
“~AC,UA”: Direct flight that must not on either Air Canada or United
-
“~AC,UA+”: One or more flights, none of which can be on either Air Canada or United
-
-
To specify two or more flights, you simply list the airline codes one after the other:
-
“AC UA”: Direct flight on Air Canada, followed by a direct flight on United
-
“AC UA+”: Direct flight on Air Canada, followed by one or more flights on United
-
For preferred connections, the syntax is similar. Inputting “NYC” means that you must have a connection in New York, while the tilde (~) is used to indicate where you don’t want to stop. Just like before, think of commas as “or” and spaces as “and”.
Here are a few examples:
-
“JFK”: A connection at New York JFK airport
-
“NYC”: A connection at any one of New York’s three airports (JFK, LGA, EWR)
-
“NYC,DEN”: A connection in either New York or Denver
-
“NYC DEN”: A connection in New York, followed by a connection in Denver
-
“NYC DEN,LAX”: A connection in New York, followed by a connection in either Denver or Los Angeles
Everything we just discussed can be combined into as specific a combination as you’d like.
One example in ITA Matrix’s list above is “DL CHI DL”, which means: a Delta flight, followed by a stop in Chicago, and then followed by another Delta flight.
Extension Codes
Let’s now move on to the Extension codes. Here’s the list of examples that ITA Matrix provides when clicking on the question mark:
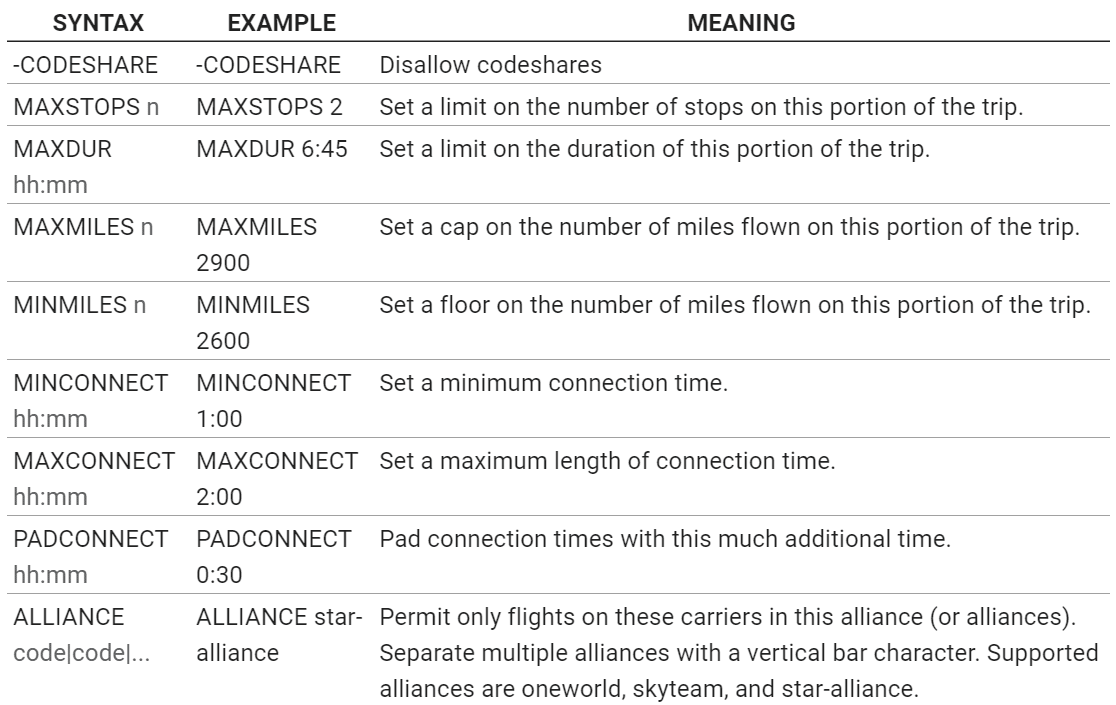
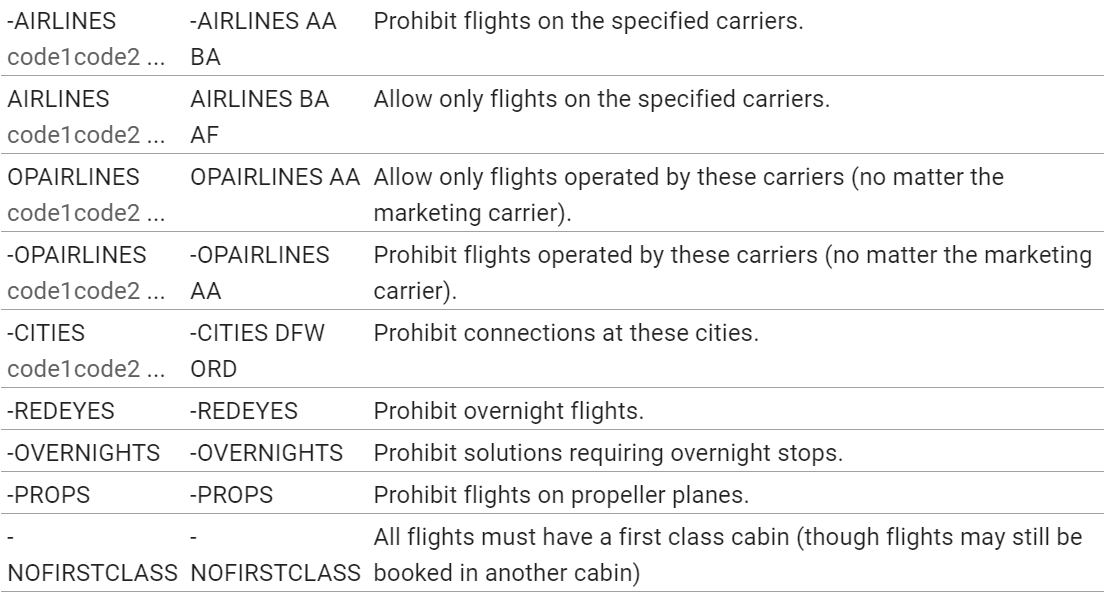
At first glance, you’ll notice that there’s some overlap between the Extension codes and the Routing codes we discussed above.
One of the examples given by ITA Matrix is “-AIRLINES AA BA”, which “prohibits flights on the specified carriers”, and this can also be accomplished using “~AA,BA+” as a Routing code.
The most useful Extension codes are probably “MINCONNECT” and “MAXCONNECT”, where using “MINCONNECT 20:00” – specifying a desired connection time of at least 20 hours – can be a viable strategy to force an overnight layover.
In a similar fashion, “MAXCONNECT” can be used to avoid an overnight layover or simply to eliminate “awkward” layovers of 6–10 hours, which isn’t really enough time to see the city but might also be too much time to simply hang out in the lounge.
“PADCONNECT” is an interesting option here, which will automatically add the amount of time you choose to the minimum connection time at every stop.
So if you write “PADCONNECT 00:30”, it will only show flights where every stop had at least 30 minutes added to the minimum connection time, which some travellers might prefer for the peace of mind.
Something that’s not listed in the examples, but can be of avid interest to aviation geeks, is the aircraft used on each flight.
This can be inserted as an Extension code using “AIRCRAFT t:xxx”, where xxx represents the IATA code of each aircraft. For example, if we’re looking to fly on the A380, the full input would be “AIRCRAFT t:380”.
Another nifty trick that can be useful is “MAXDUR hh:mm”, which can be used to specify the total duration of the trip. For example, if you input “MAXDUR 10:30” on a flight from Toronto to Vancouver, the total duration including flights and layovers cannot exceed 10 hours and 30 minutes.
(Note: While using uppercase Routing and Extension codes appear to be consistent with ITA Matrix’s syntax, lowercase appears to work just fine too.)
Putting It All Together
We’ve just covered most of ITA Matrix’s basic features, but let’s put it all together using a few examples.
Let’s use the elementary school-style of forwards and backwards thinking to test our understanding.
In the first example, we’ll input commands into ITA Matrix to find the cheapest flight for our desired trip, and in the second example, we’ll examine an ITA Matrix input, dissect what it means, and think about what kinds of flights ITA Matrix should output as a result.
Example 1: Putting Together a Search
Let’s say you’re looking to travel one-way from Halifax (YHZ) to Vancouver (YVR) anytime in March 2025, and you don’t mind travelling up to 100 miles within either the origin or destination to catch a cheaper flight.
You aren’t picky about aircraft type, but in order to minimize inconvenience, you don’t want more than one connection along the journey.
Furthermore, that one connection shouldn’t be longer than two hours, given that you want to strike a delicate balance between rushing for the next flight and sitting idly in the terminal.
Since you have status with Air Canada through Everyday Status Qualification, you’ll be looking to fly with Air Canada to take advantage of your free checked baggage allowance. You can also possibly use eUpgrades to book in economy and upgrade to business class.
First, input “YHZ” as the Departure and “YVR” as the Destination, selecting the calendar of lowest fares and inputting March 1, 2025 as the start of the month-long period (so as to search across all dates in March 2025).
Then, use the “Nearby” button next to the origin and destination fields to select all airports within a 100-mile radius from both.
For Stops, choose “Up to 1 Stop” with no extra stops. Also, uncheck “Allow airport changes”, since you don’t want to be changing airports during your layover.
Finally, use the Advanced Controls to select Air Canada flights only, with a maximum connection time of two hours.
All said and done, this is what the search input looks like:

And here is the search result:

We can see that the cheapest possible price is $499, with other fares only $8 more expensive.
Since you want to leave earlier if possible, go ahead and select March 1. The next screen will show us all the available flight results on that date:

Clicking through on the $499 fare brings you to this page, where you can view the details of the selected flight.

Looking back to the list of flights on March 1, perhaps you decide that the price difference between $499 and $507 isn’t quite great enough to justify the two-stop option, so at this point you might choose to simply go with the itinerary that has only one stop in Toronto (YYZ).
Still, it’s a good thing that we searched for nearby airports to begin with, so your bases are covered.
Example 2: Analyzing a Sample Search
Let’s take a look at the following sample search and analyze what it means (the cut-off Extension codes read as “MINCONNECT 04:00; AIRCRAFT t:380”):

First off, we can see that we’re searching for a flight from any New York City airport to Singapore Changi Airport (SIN) in Singapore.
We are specifically looking to fly within a two-day window around April 25, 2025, and only in First Class.
The Routing codes indicate that we’re willing to fly only on Singapore Airlines for any number of segments with any number of stops. This would encompass the New York–Singapore direct flight (the longest in the world), as well as the one-stop fifth-freedom routing via Frankfurt.
Meanwhile, the Extension codes indicate that the only aircraft we’re considering for the journey is an Airbus A380 on all segments, and of course, we need at least four hours in between our flights to break up the journey.
More Advanced Controls
In the previous examples, we mainly discussed fare codes in the “Itinerary” section, specifically focusing on the most commonly used ones: MINCONNECT, MAXCONNECT, and MAXDUR. We used these to specify the minimum connection time, maximum connection time, and maximum trip duration, respectively.
Now let’s talk about another section of extension codes, which pertain to the fare class (also known as a fare code or fare bucket) of specific airlines or alliances that we wish to fly.
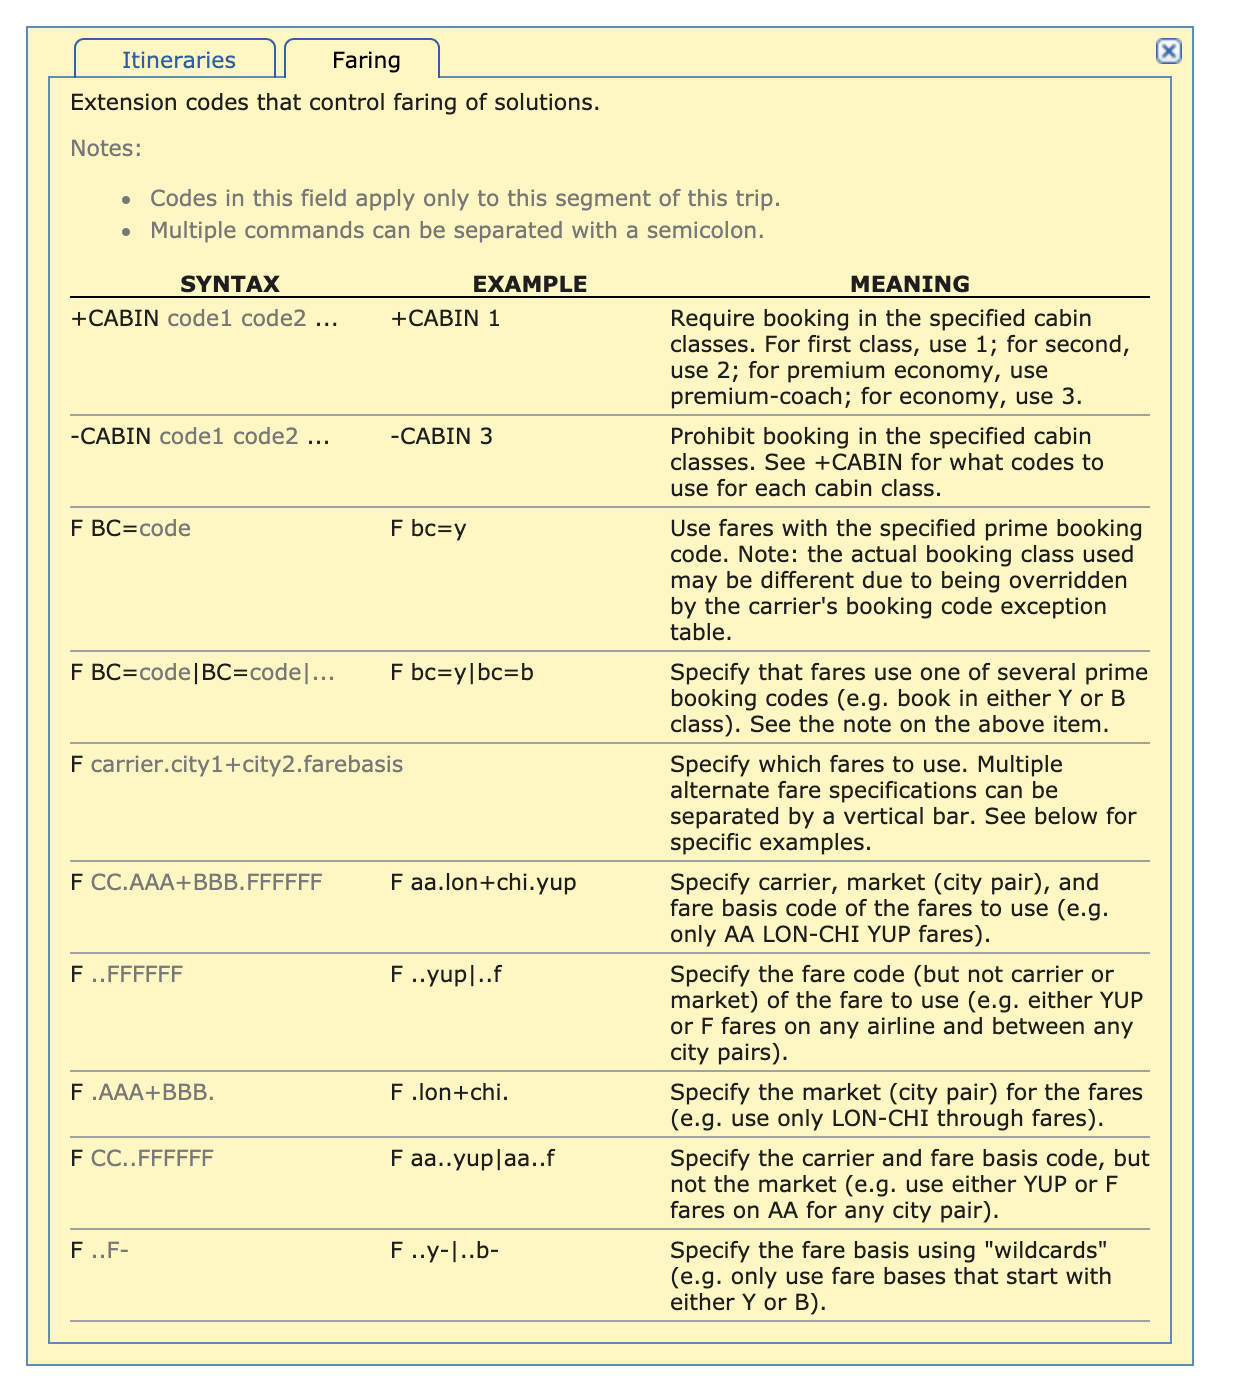
Specifying a Fare Class
The examples provided by ITA Matrix are all useful, but let’s focus on the “F BC =” code, which allows you to search for one or several specific fare classes even within the same cabin.
For example, you might wish to book a specific fare code to optimize your Air Canada eUpgrades, or to ensure you earn 100% miles on your ticket when credited to a given frequent flyer program.
Let’s imagine that we wanted to specify an Air Canada “M” fare, which is the lowest Flex fare that doesn’t require a co-pay fee when using eUpgrades on an international booking.
To request a flight in a certain fare code, we simply enter “F BC=M” in the Extension Codes field.
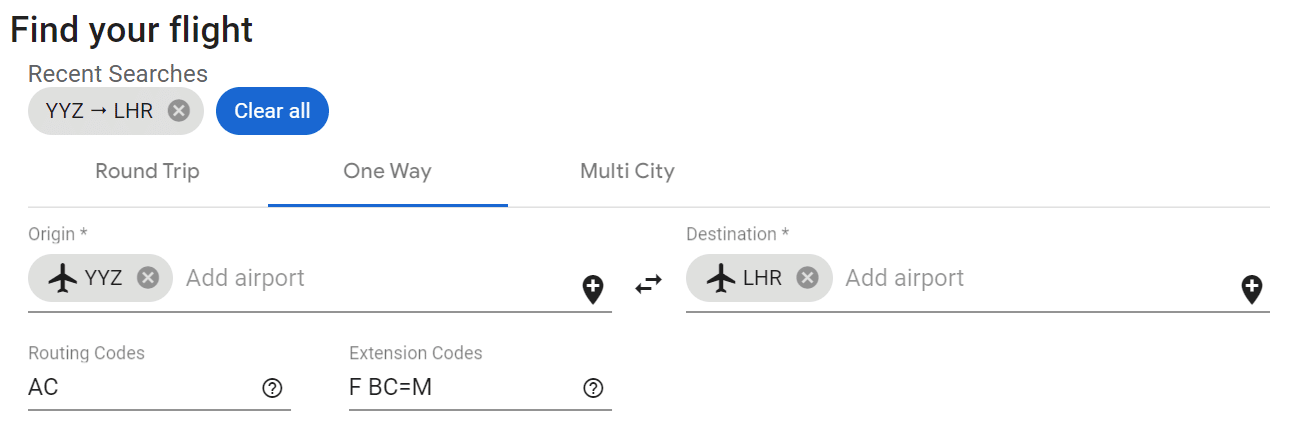
The resulting search pulls up the Air Canada fare in the “M” booking class.
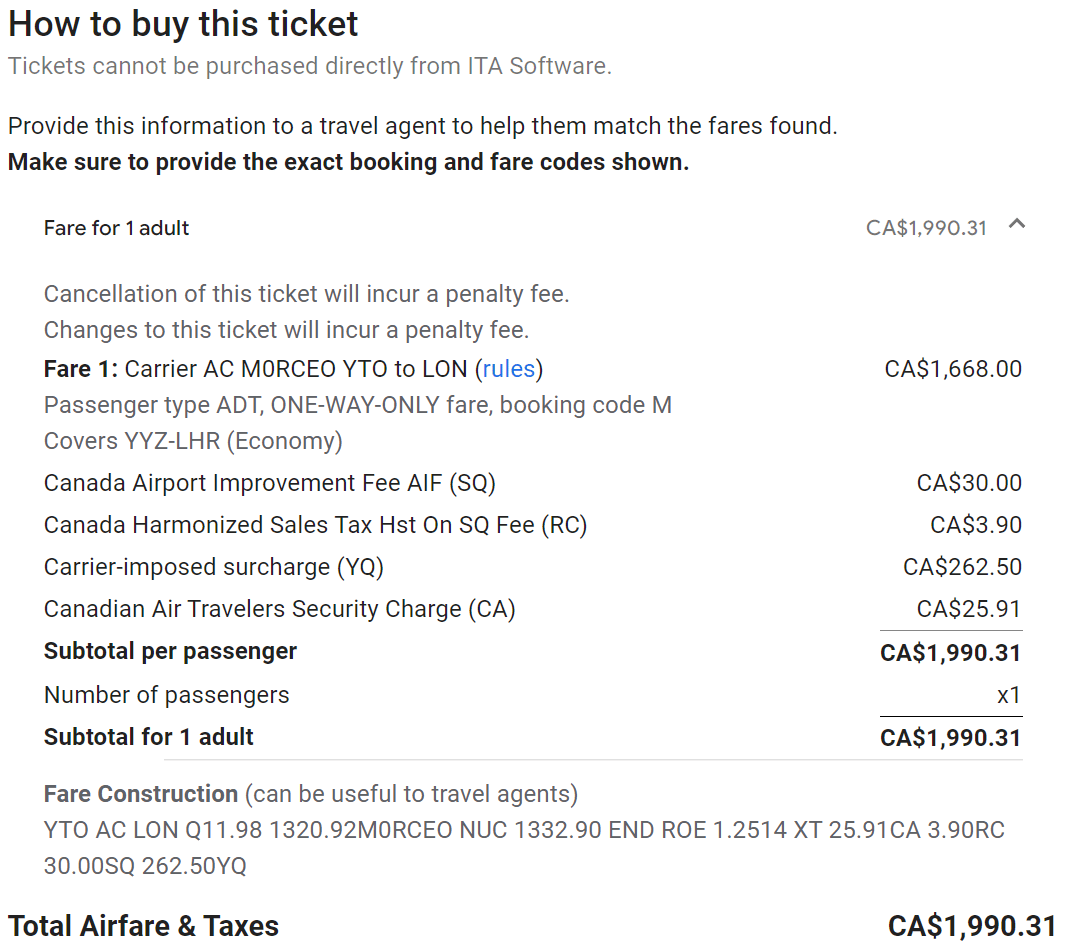
Marketing vs. Operating Airlines
Something else that the savvy traveller might care about is the marketing and operating airline for a given flight.
After all, in the world of transatlantic joint ventures, codeshares are a necessary and common occurrence. However, whether you’re aiming for airline elite status or simply trying to maximize your mileage earnings, you’ll notice that most loyalty programs have different earning rules depending who is marketing and who is operating the flight.
For example, under the Aeroplan loyalty program, tickets issued by Air Canada will eventually be subject to fare-based instead of distance-based points earning, which will result in lower points totals for most travellers.
If the flight is marketed by a partner airline, like Lufthansa, instead, even if it’s operated by Air Canada, you may come out ahead in terms of the number of Aeroplan points you earn.
To request a flight operated by an airline, we use the extension code “O:” followed by the airline’s two-letter IATA code. If we want a transatlantic flight operated by Air Canada, we would write “O:AC” in the routing code.
Now, if we also wanted to specify flights marketed by Lufthansa in order to avoid Air Canada’s new fare-based points earnings, we would input “O:AC” in the routing code and “AIRLINES LH” in the extension code, like below.

(Note: Entering “AC” as the routing code is not the same as entering “O:AC”. The former specifies a flight that’s operated by and marketed by Air Canada, while the latter only specifies the operating airline, allowing you to further specify the marketing airline in the extension codes.)
The resulting search pulls up the desired flight that’s operated by Air Canada but marketed by Lufthansa. Booking this flight on a Lufthansa-issued ticket would allow you to continue earning Aeroplan points based on distance flown, rather than based on the fare you paid under the Aeroplan program.

As you can see, ITA Matrix’s advanced routing and extension codes are incredibly powerful and customizable.
You should visit the website and play around with all the advanced controls we’ve discussed, and maybe some that we haven’t, to get started building the itinerary of your dreams (or nightmares…)
How to Book Itineraries Found on ITA Matrix
ITA Matrix is a powerful tool for understanding airfare and pricing out exact itineraries. However, by design, it doesn’t provide a direct link to book the itineraries that it finds.
Instead, you’ll have to either work with a travel agency (online or brick-and-mortar) to book itineraries that you find on ITA Matrix, or book directly with the airline.
You should always try to book directly with the airline, for the usual benefits such as having an easier time making changes, requesting refunds, or rearranging your travel plans in the case of IRROPS.
If you prefer to work with a travel agent, you can likely send them the itinerary and they can construct the fare through the travel agency’s ticketing portal.
There are a few successful data points out there of travel agents that work with fixed-value points programs being able construct these customized ITA Matrix itineraries and help you book them using your loyalty points. However, this likely comes down to the skill and willingness of the individual agent.
Flight redemption schemes in Canada you can try are CIBC Aventura Airline Awards Chart, RBC Air Travel Redemption Schedule, and Amex Fixed Points Travel.
However, there’s one very useful tool that can help get around ITA Matrix’s limitations and empower you to book itineraries yourself: ITA Matrix PowerTools.
PowerTools is a custom add-on developed by members of the FlyerTalk community to make ITA Matrix even more powerful than it already is, and is by far the smoothest way to book your ITA Matrix itineraries.
ITA Matrix PowerTools
The final piece of software we’ll cover here is ITA Matrix PowerTools, an add-on to ITA Matrix that supercharges its capabilities even further. This requires a little more technical know-how than the previous items we’ve discussed, but still nothing too extreme.
Remember that ITA Matrix is great for finding fares, but doesn’t actually allow you to book anything through its native software. ITA Matrix PowerTools is a piece of JavaScript software that allows you to book itineraries that you find ITA Matrix itineraries via online travel agencies (OTAs).
There are a few different ways to install ITA Matrix PowerTools, and I recommend checking out the FlyerTalk thread for the full installation instructions.
Once PowerTools is installed, it should look something like this (for reference, this is on Google Chrome):

Navigate to matrix.itasoftware.com, and you’ll know that PowerTools is active when you see the “Passengers (1a)” bar at the top left of the screen.
Note that PowerTools full functionality can only be found on the old interface. This old interface will eventually be removed from the ITA Matrix website, but hopefully the full functionality of PowerTools will eventually be incorporated into the new platform.
To get to the old interface, click on the link on the yellow banner on the main website.
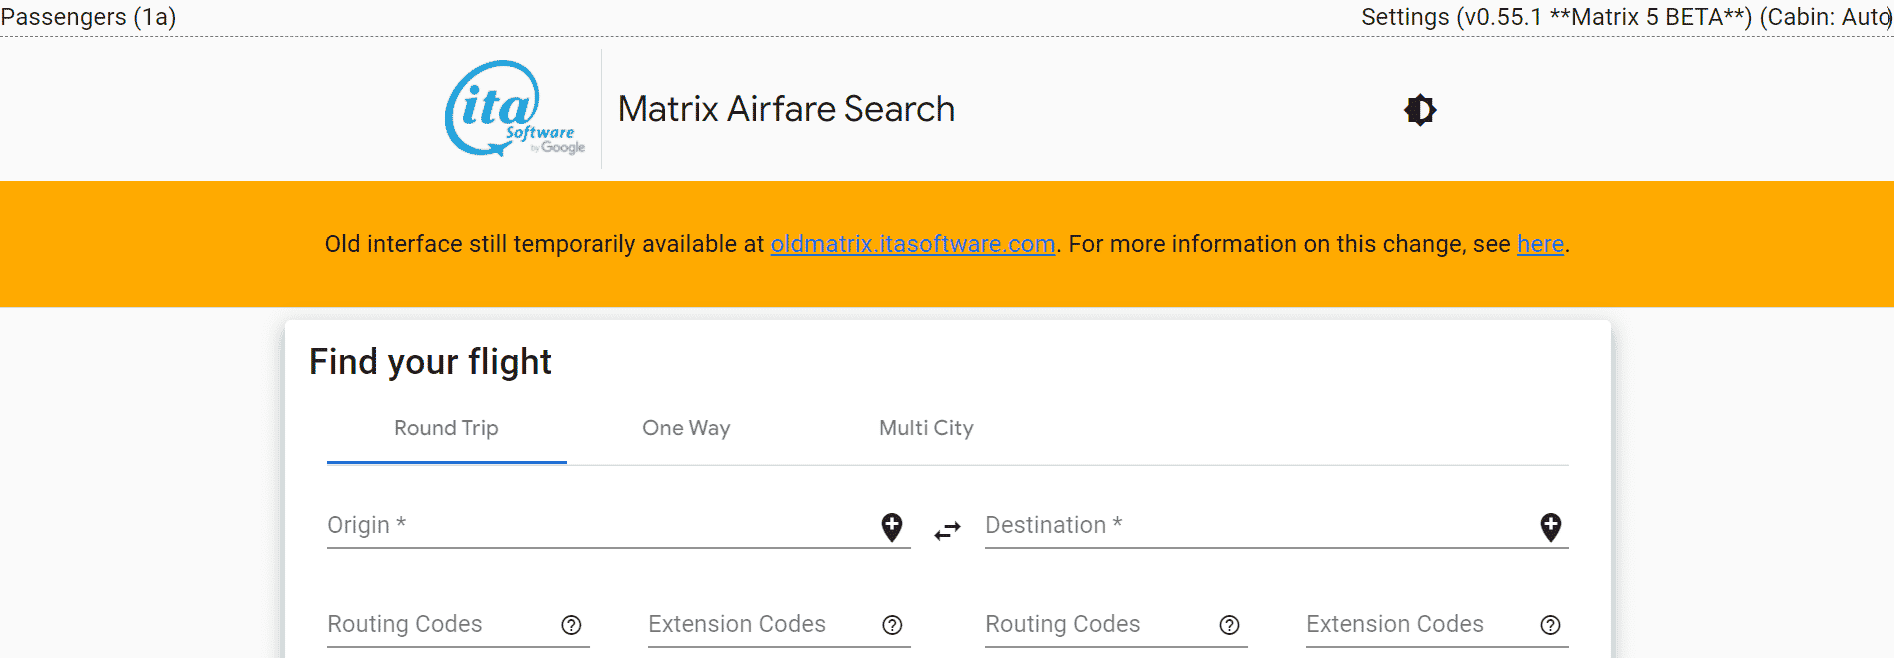
Enter in all of the information as you would have otherwise done in the new interface.
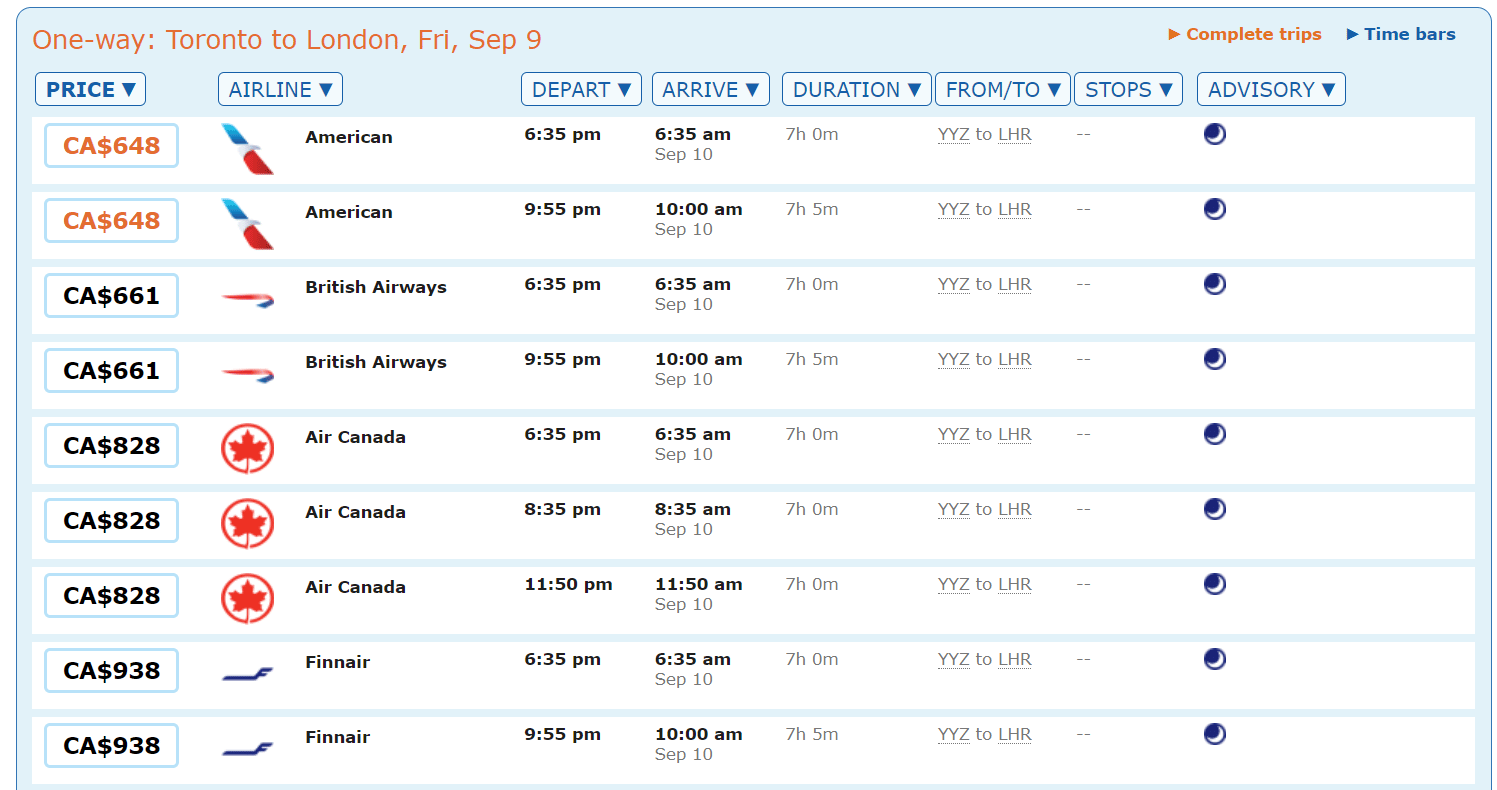
To book an itinerary, simply begin your search using the guidelines outlined above. For this example, let’s search for a simple Toronto to London itinerary as a non-stop only:
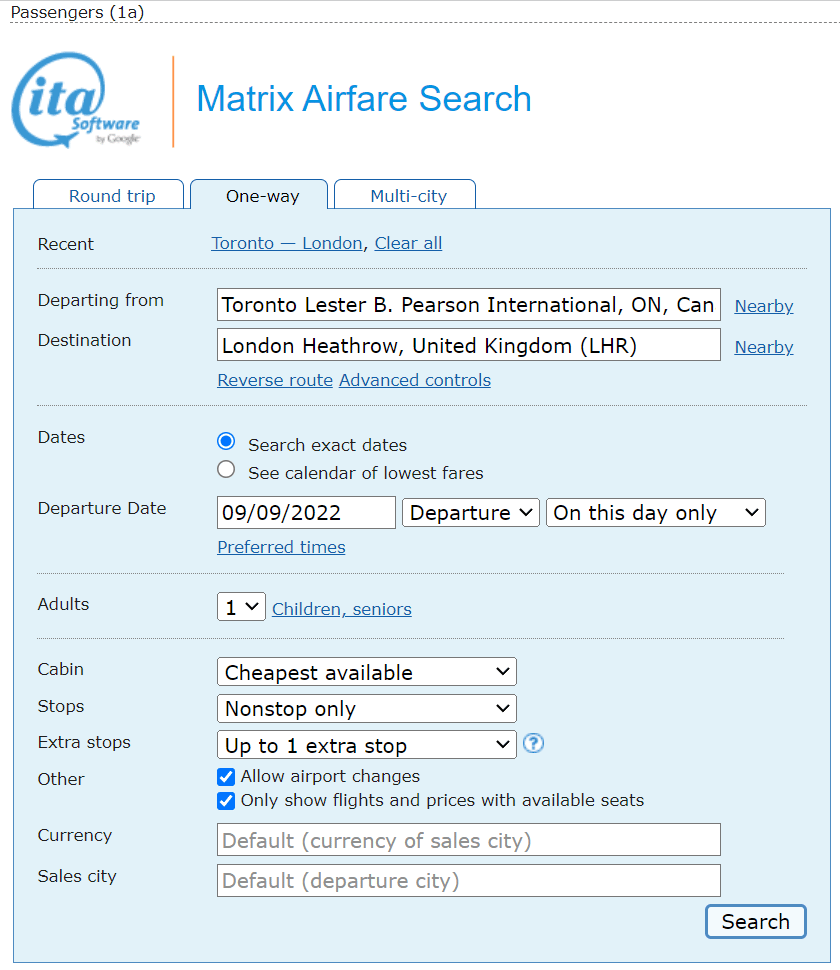
Looking at the options, our traveller decides to go with Air Canada rather than the British Airways or American Airlines codeshare options. Even with a price difference, their Aeroplan Elite Status status will come in handy for both lounge access and eUpgrade potential.
Compared to before, the page with all fare information is looking considerably more filled out.
The entire right-hand side is powered by ITA Matrix PowerTools, showing the mileage, the cents-per-mile calculation, as well the list of booking options, each providing a direct booking link to the airline or OTA’s website.
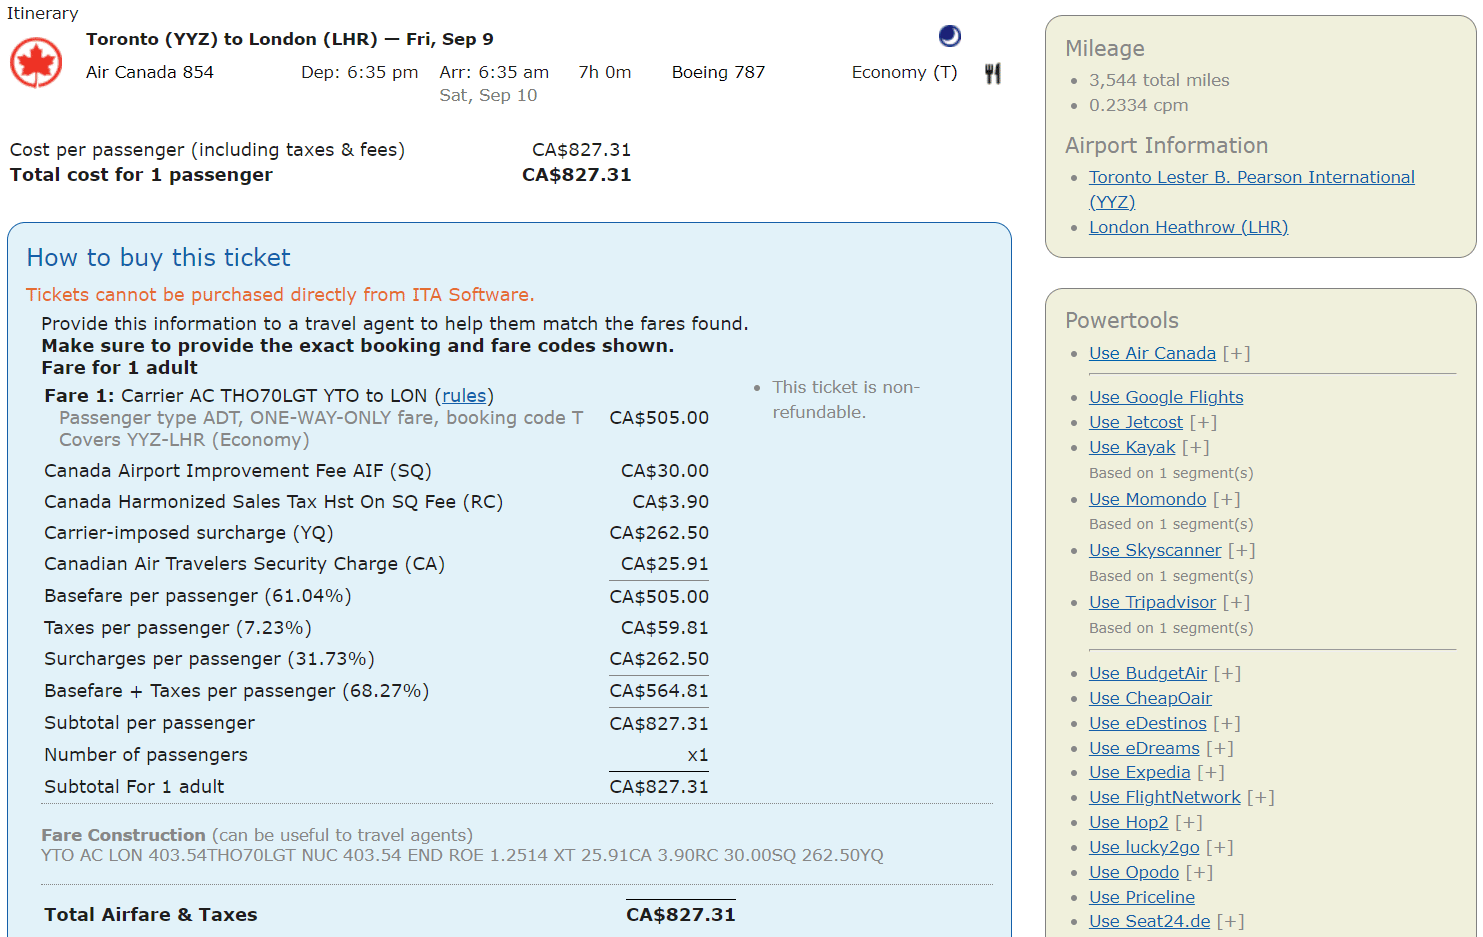
There’s also a Where To Credit link underneath the booking links, which will bring you directly to the exact fare on the Where to Credit website, showing you how many miles you’ll earn when crediting this flight to all of the possible frequent flyer programs.
This is very useful for putting together mileage runs, or simply for figuring out how many redeemable miles you’ll be earning before you book.
Booking is as simple as it looks: clicking on your desired airline website’s or OTA’s link will bring up the corresponding booking page with all your fare options selected exactly as searched on ITA Matrix.
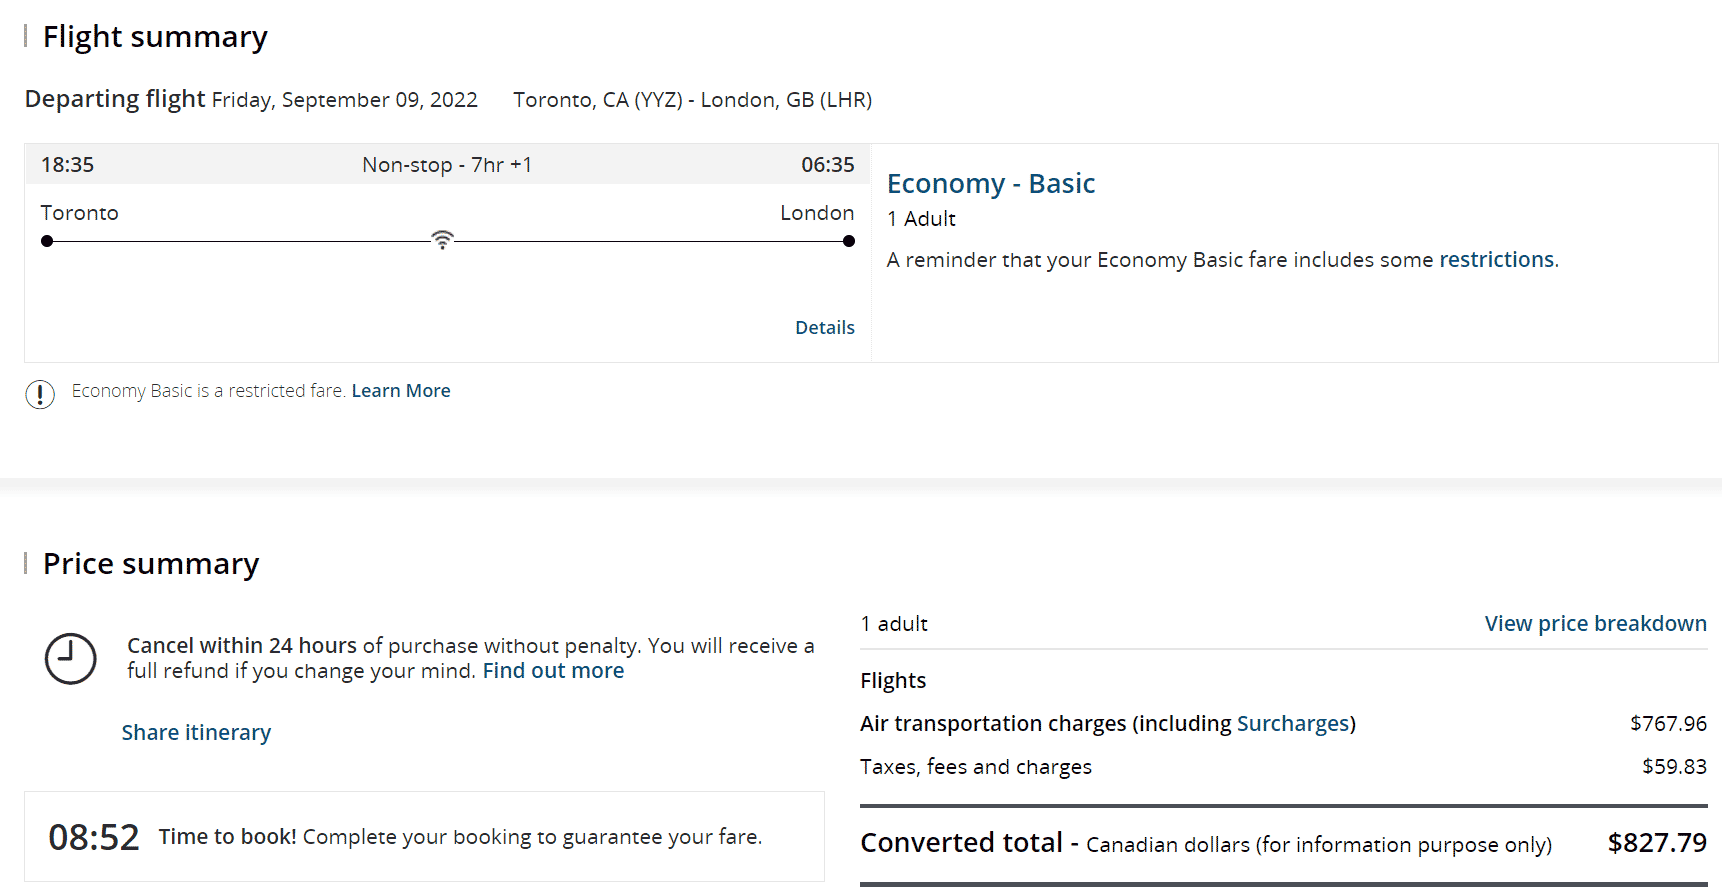
Let’s click on the Air Canada booking link, since it’s generally best to book directly with the airline whenever possible. Note that if you click the “+” sign next to Air Canada, there will be an option to choose a country from which you’d like to purchase the fare or to add a promo code, should you have any extra 15% off codes lying around.
This brings us to the booking link on the Air Canada website, as if we had searched directly on the website itself. Simply click through to complete the booking.
Conclusion
For the savvy traveller, ITA Matrix is one of the most all-encompassing tools out there for finding, understanding, and maximizing airfare, especially when combined with the ITA Matrix PowerTools browser extension.
While ITA Matrix’s searching and filtering functions and advanced routing codes are already extremely powerful, PowerTools takes things to the next level by offering additional insight into the fares you find, as well as allowing you to book directly with the airline or online travel agency of your choice.
As you can tell, ITA Matrix is one of the most powerful travel tools we’ll be covering in the “Use It Like A Pro” series.













Tremendous article, Ricky. Your detailed and easy read explanations not only permitted an understanding of MatrixITA, but allowed me to quickly download Matrix PowerTools – two other sites made the explanation of the later process so convoluted that I gave up.
The screen shots are a good idea – thanks.
I cannot find any of the 3rd party sites down the right hand side to match the price Matrix quoted, unfortunately. Even the airline was well above the quote. Is that normal, please?
How would you use this tool if you were to use points to pay for flights?
This is awesome, I’ve heard about the ITA Matrix but haven’t known how to use it. One question though – I’m looking at various business class flights and seeing that in the fare class column of the results some say Business (P), some say Business (J), and others Business (D), what is the difference between all of these?
Hi Daniel,
You’ll find economy tickets usually come with the most fare classes with progressively as we move to First. Additionally, you can read this post: https://princeoftravel.com/blog/air-canada-altitude-optimizing-your-eupgrade-strategies which provides a good example of how fare classes affect our use of e-upgrades on Air Canada.
*progressively less
Great post! The computer geek in me is very happy. The "time bar" version of the results pages is pretty useful to visualize your duration, layover, and carrier too.!
If you call air canada for buissniss there agents can book ITA routing as they have tickets that other air canada agents do not have access too.
Another great introduction to a program that can be very intimidating. At least to me.
The article makes me want to go fire up a Unix computer and nurture my inner nerd-self.
Thanks so much for your explanation of ita matrix. I always felt that it would be a valuable tool but frankly am too lazy to figure it out myself.
This is just more valuable information that the Prince of Travel provides to his subscribers.
I am looking forward to using this information and also reading part 2.
Great write-up. I’ve used ITA to find some reasonable deals in the past. Google Flights changes things, but ITA is still ideal to laser focus on what you want (If it’s available, of course).